
MODULE FIVE-B: TESTING POULTRY FOR PULLORUM-TYPHOID DISEASE
This module applies ONLY to individuals who have attended and successfully completed an Indiana State Poultry Association NPIP Blood Testing School Class.
WHAT YOU WILL LEARN IN THIS MODULE
This module is a review of the materials taught at the ISPA NPIP Blood Testing School. Only Indiana certified NPIP blood testers (individuals who have taken the class within 3 years) are legally allowed to test and certify the results of the pullorum-typhoid whole-blood plate test. This module covers:
The step-by-step procedures for performing a rapid whole-blood plate test to detect pullorum-typhoid disease
What you can do to improve the accuracy of your test results
The evaluation of a pullorum-typhoid test result
What to do in the case of a positive test result for pullorum-typhoid disease
TESTING FOR PULLORUM-TYPHOID DISEASE
Even when a bird looks healthy, it may be carrying certain bacteria or viruses. This is the case with pullorum-typhoid disease, an egg-transmitted infection that can cause major devastation to a flock. Owners can protect their flocks and their investment by learning to do a simple blood test to detect this type of infection.

The most common test used to detect pullorum-typhoid disease is the rapid whole-blood plate test. Three other tests— the rapid serum plate test, the tube agglutination test, and the microagglutination test—can also be used but must be performed in an authorized laboratory. A negative test result— either from an authorized lab or a certified blood tester—is required for all birds that will be exhibited.
Infected birds that don’t die of pullorum-typhoid disease may grow to maturity and remain lifetime carriers. The rapid whole-blood plate test, like the other three methods, tests birds for immune substances called antibodies, which are proteins that are carried in the bloodstream following exposure to the disease.
To detect antibodies in the blood, a solution called an antigen is used. The antigen is made from pullorum-typhoid bacteria that have been chemically killed and suspended in a salt solution. When this antigen is mixed with the blood of a disease bird, the antibodies agglutinate. Simply put, this means that the pullorum-typhoid antibodies clump together with the antigen.
A bird showing this type of result is labeled as being a reactor. Since the blood of a healthy bird does not contain pullorum-typhoid antibodies, no clumps form when its blood is mixed with the antigen.
Much of the success in preventing the spread of pullorum-typhoid disease in chickens and other birds can be directly attributed to the rapid whole-blood plate test. This simple procedure, when properly done, accurately detects birds carrying pullorum-typhoid antibodies in their blood. This test can be easily done by anyone who has been trained in the proper techniques.
MATERIALS NEEDED FOR TESTING
Materials needed to conduct the rapid whole-blood plate test include:
Bottle of properly stored antigen • disinfectant(s)
Portable table
Glass, porcelain or opaque plastic testing plate(s)
Light box (optional)
Bleeding needle and standardized blood loop. Note: Although there are different kinds of blood loops, for this test they must all be:
20-gauge wire
2 1/2 inches in length
3/16 inch diameter loop
Container of fresh water (for rinsing the bleeding needle and blood loop)
Bucket of fresh water (for rinsing the testing plates)
Identification bands for birds showing a positive reaction
Large scrub brush
Squeegee
Soft, clean cloths

In addition, you will need the following:
Clean coveralls and headgear
Rubber boots, (disinfected)
Holding pen for the birds being tested
Separate coop/pen for isolating any birds that test positive
SAFE HANDLING PROCEDURES
1. Antigen
Proper handling of the antigen is important for obtaining accurate test results.
When not being used, the antigen should be stored in a refrigerator at approximately 45 degrees Fahrenheit.
Before testing, remove the antigen from the refrigerator and allow it to warm up to room temperature (65–75 degrees Fahrenheit).
Refrigerate the antigen again immediately after testing to keep it fresh.
Using past-date or improperly stored antigen increases the possibility of unreliable results.
If a large number of positive results are observed, these may be false reactions caused by using old antigen that becomes too sensitive.
2. Birds
When performing the rapid whole-blood plate test, it is extremely important to handle the birds properly so that none are harmed.
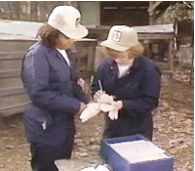
When testing a large number of birds, the testing procedure should involve a minimum of three to four people: one or two to catch the bird to be tested, one to position and hold the bird during testing, and another to draw the blood and test it.
Two people can manage the procedure if only a few birds are tested.
Everyone involved in the testing must practice safe biosecurity techniques.
This means wearing clean coveralls, headgear, and rubber boots. Each person should carefully scrub his or her boots with a disinfectant before coming into contact with the flock.
BEFORE YOU BEGIN THE TEST
To achieve the most reliable testing results, everyone involved in the testing must practice good biosecurity techniques.
Each person should wear clean coveralls, headgear, and rubber boots.
All participants should carefully scrub their boots with a disinfectant before coming into contact with the flock.
It is important to gather all materials before you begin testing, so you do not have to leave the poultry area.
Set up your portable table and testing materials close to the area for catching birds.
Only after checking to make sure you have all of the testing materials needed to perform the tests, you may begin Step 1.
Do not begin Step 1 until you have all of the testing materials properly prepared.
STEPS FOR CONDUCTING A WHOLE-BLOOD PLATE TEST
Step 1. Apply antigen to the test slide.
Ideally, the testing plate needs to be somewhere between 70 and 90 degrees Fahrenheit.
At this temperature, the plate should feel warm to the touch.
If the testing area is cold, place the light box under the testing plate to warm it.
Hold the dropper straight up and down, close to the glass surface, to keep the antigen from splattering.
Allow normal-size drops to fall one at a time onto the testing plate.
If the antigen should accidentally spill during handling, there is no danger of spreading the disease, since the organisms are dead.
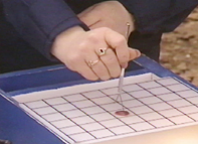
While some testing plates are plain, many have a large number of squares printed or etched on them. This allows for groups of up to 60 birds to be tested with 10 grams of antigen being applied in a row at one time. Make sure that the drops of antigen don’t dry up on the plate before being mixed with blood.
Step 2. Position the bird’s wing.
Be sure to handle the birds with care.
Gently turn the bird on its back with a grip on their legs to prevent the bird from clawing.
Tuck one wing close to the body so the bird will not flap when blood is drawn. Larger birds may require two people to position.
With the assistance of another person, extend the bird’s wing and spread it out flat on the table so the underside is exposed. This uncovers the wing vein, or brachial vein, which is the large blue vein from where the blood sample is taken.
Keep in mind that feathers may need to be plucked from this elbow area to expose this vein.
Have a paper towel ready to place on the inside of wing to clot birds that may be excessively bleeding.
Step 3. Use the bleeding needle to puncture the wing vein and draw the blood sample.
After the testing plate is prepared with the antigen, hold the bleeding needle like a pencil and gently puncture the wing vein.
Keep in mind that the needle needs to be sharp so this can be done easily.
To help make the procedure as simple as possible, a commonly used type of bleeding needle also has a blood loop attached.
Using a blood loop with the correct diameter provides the exact amount of blood needed to perform the test.
Step 4. Mix the collected blood with the antigen on the testing plate.
When the blood loop is full, without any gaps, the blood contained in it should be mixed with one of the drops of antigen on the testing plate.
The loop is used to combine the bird’s blood with the antigen on the testing plate.
When doing this, it is necessary to mix the blood and antigen together so they form a smear about the size of a quarter.
Step 5. Clean the bleeding needle and blood loop.
After combining the sample of blood with the antigen, you must clean the needle and loop before drawing the next blood sample.
Rinse them in a container of fresh water, then wipe them with a clean cloth.
(Repeat steps 2-5 until the testing plate is full).
Step 6. Rotate the testing plate and watch for a reaction.
With the blood and antigen mixed together, the testing plate needs to be tilted in a circular motion for about two minutes, so any reactions can be observed.
Sometimes a positive result will be evident after only 15 to 30 seconds.
Place the light box under the testing plate to make results easier to see.
Step 7. Evaluate your test results.
Negative Test Result
No clumping of sample after 2 minutes.
Bird may be returned to the flock.
Positive Test Result
Clumping occurs in sample within 2 minutes.
If clumping occurs, it only indicates a possible positive test result. This result must be verified by further testing conducted by an authorized laboratory.
Do not panic! It is possible this is a false positive. Follow-up testing will need to be performed to verify the result.
Attach identification band to mark the bird as a positive reactor.
Isolate the bird immediately from the rest of the flock until further testing can be completed.
Contact the Indiana State Poultry Association immediately at (765) 494-8517 for information about what steps to take next.
A determination of a positive reaction is made by looking for clumps that form after mixing the bird’s blood with the antigen. This happens when the antibodies in the blood combine with the killed bacteria. For the rapid whole-blood plate test, a blue or red dye is added to the antigen so the bacteria becomes stained, making it easier to interpret the results. If the reaction is positive, blue or red clumps can be seen in the mixture following an interval of between fifteen seconds and two minutes.
Remember, there are various degrees to which this reaction, called agglutination, takes place. If the results are negative, meaning that the tested bird does not have pullorum-typhoid disease, no clumping will be evident. But a true positive reaction shows a definite clumping, or agglutination, while causing the blood and antigen mixture to become clearer, or more transparent, where there are no clumps.
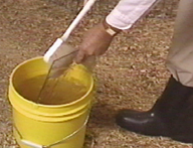
Sometimes dust on the testing plate may look like a positive reaction. To tell the difference, remember that clumping caused by dirt takes place only in one or two spots. To help avoid possible dust and to make sure that the smears don’t dry up following a test, clean the plate as soon as possible after the results have been determined. To do this, dip the testing plate in a bucket of clean water, use a large scrub brush to remove all residue, then wipe it dry with a squeegee and clean cloth.
A positive test result, however, does not always mean that a bird is infected with pullorum-typhoid disease. Sometimes a reaction is caused by what is called cross agglutination. This happens when other antibodies are present—ones that are produced by an antigen closely related to those of pullorum-typhoid bacteria.
If you have a positive test result, contact the Indiana State Poultry Association immediately at (765) 494-8517 for information about what steps to take next.
PREVENTING PULLORUM-TYPHOID VIDEO
Please watch this video as a review of how to prevent and test for P-T by clicking this link to YouTube.
ONLINE NPIP BLOOD TESTING SCHOOL CERTIFICATION
Only Indiana certified NPIP blood testers (individuals who have taken the class within 3 years) are legally allowed to test and certify the results of the pullorum-typhoid whole-blood plate test.
If your certification has expired and you have successfully completed an NPIP Blood Testing School Class either at Purdue (West Lafayette) or at SIPAC (Dubois), you can take the on-line Blood Testing School.
For more information, go to the “Health,Schools” tab on the ISPA website and look for “Recertification for NPIP Blood Testers”.

Module 5-B Quiz

Congratulations on completing Module 5-B!